
If you live in Canada and you’re eager to dive into the world of blogging, then you’re in the right place.
This comprehensive guide will walk you through the step-by-step process of how to start a blog in Canada, and every other thing you need to know to get going.
In today’s digital world, blogging has evolved into a vital medium for self-expression, knowledge sharing, and connecting with like-minded people. Starting a blog can be an exciting and rewarding effort, whether you’re a passionate writer, an expert in a certain industry, or simply someone with a unique perspective to share.
In my time in this space, I’ve seen a lot of individuals come into blogging and quit without achieving their goals; Which is why I decided to share this guide with you to help make the process easier.
While it is true that blogging is rewarding, it takes a lot of targeted effort and patience and only the fittest survives. If I’m asked why people fail in this space, I’d say one of the major reasons is because they come into blogging with the mind of making quick money and when things don’t go as they planned, they quit.
I started my blogging journey about half a decade ago and I kid you not it wasn’t easy. My first blog failed, same as the second but I never stopped there cause it is something I’m passionate about.
How Do You Become a Blogger in Canada?
To become a blogger, you need to choose a blogging niche or an area you want to focus on, The next step is to select a domain name for your blog, buy a hosting service, and install blogging software like WordPress that will run and manage your blog online. Voila!
With the information above, we can say that starting a blog is primarily concerned with three issues. Your site’s domain name, web hosting (the service that allows your blog to run online), and blogging software (WordPress).
But how do you become part of the few successful bloggers? How do you stand out? Check the next section.
How To Become A Successful Blogger in Canada
From my years of experience, I can say that becoming a successful blogger is very much possible. It consists of the following procedures;
- Choose a niche
- Launch your blog
- Create search-engine-optimized content for your blog
- Be consistent with publishing content on your blog
- Get traffic
- Monetize your blog
Number 3 on the list above is one of the most important aspects of creating a successful blog in Canada. I often tell my students that content is king, Meaning without quality content, there’s a high chance that your blog will crumble. But not to worry, as we go on I will give you helpful insights on how to create quality content on your blog.
How Much Does It Cost to Start a Blog in Canada?
This is a question people ask almost on a daily basis and I’m glad to share the answer here.
Unfortunately, it is very difficult to pinpoint a specific amount when it comes to starting a blog. However, you can expect to spend between $50 and $200 getting your blog set up.
After that, your monthly costs should be around $20 to $60 per month.
The cost of starting a blog in Canada can vary depending on your specific needs and preferences. Here are some common expenses to consider:
- Domain Name: The cost of a domain name typically ranges from $10 to $20 per year, depending on the domain registrar and the domain extension (.com, .ca, etc.) you choose.
- Web Hosting: The cost of web hosting can vary based on factors such as the hosting provider, hosting plan, and the resources allocated to your website. Shared hosting plans, which are suitable for beginners, can range from $3 to $15 per month. As your blog grows, you might consider upgrading to more advanced hosting options, such as VPS or dedicated servers, which come with higher costs.
- Design and Themes: Many blogging platforms offer free themes, but if you want a more unique and professional look for your blog, you may consider purchasing a premium theme. Premium themes usually range from $30 to $100, depending on the quality and features they offer.
- Plugins and Extensions: Depending on the functionality you desire for your blog, you may need to purchase or subscribe to premium plugins or extensions. Prices can range from free to several hundred dollars, depending on the complexity and popularity of the plugin.
- Content Creation: While it’s possible to create content for your blog yourself, you might also consider hiring freelance writers, photographers, or graphic designers to enhance the quality of your blog posts. The cost of content creation varies depending on the scope and expertise required.
- Marketing and Promotion: To attract readers to your blog, you might invest in marketing and promotion. This could involve activities such as social media advertising, content distribution, or email marketing. The cost of marketing and promotion can vary widely based on your strategy and budget.
It’s important to note that the expenses listed above are rough estimates and can vary depending on your specific choices and requirements. Additionally, it’s possible to start a blog with minimal costs by using free platforms and themes.
However, investing in a domain name, web hosting, and some essential tools can provide you with more control, flexibility, and a professional image for your blog.
How To Start a Blog in Canada and Make Money
Finally, the moment you’ve been waiting for – How to Start a Blog In Canada. For the sake of clarity, I will be listing and explaining the 8 steps on how to start a blog in Canada. Without any further words, let’s go!
Step 1. Choose a Blogging Niche
First things first. Before you start a blog in Canada, having a blogging niche is important. And what is a blogging niche?
When I say niche, I mean your area of interest, or your area of specialization. For example, you might want to talk about food, fitness, sport, entertainment, and so on.
The goal is to pick whatever you are comfortable creating content for and have large keyword search volume on google.
Having said that, it is also important to note that blogging has different categories of niches. We have the Super Niches, Sub-Niches, Super-Sub Niches, and Super 2 Sub-niches. Are you confused? Well, don’t be. Here’s more detailed information;
- Super Niches: These are large topics and niches that are hard to rank for.
- Sub-Niches: These are the lesser topics or niches but they are also difficult to rank for.
- Super-Sub Niches: These are more like the breakdown of Sun-Niches. They are easier to rank for with fewer competitions.
- Super 2 Sub-niches: While these are very easy niches and topics.
For a better understanding, here’s an example;
- Super Niche: Sports – Hardest to rank for
- Sub-Niches: Football– Hard to rank for
- Super-Sub Niches: Manchester United– normal to rank for.
- Super 2 Sub-niches: Manchester United Players Profile – simpler to rank for.
If you already have a niche, you can skip to the next step, but if you don’t, I’ve created a list of the top blogging niches for Canadian bloggers below to make the process of picking a niche much easier.
Top Blogging Niches for Canadian Bloggers
- Pregnancy
- Personal Finance
- News
- Personal Blog
- Fitness
- Photography
- Online business
- Careers
- Travel
- Test Preparation
- Graphics
- Health
- Men’s Talk
- Investing
- Productivity
- Real estate
- Cryptocurrency
- Artificial Intelligence
- Sex Intelligence
- Wealth
Step 2. Name your Blog and Get Web Hosting
Now after selecting your niche, the next step is to pick a name for your blog and get web hosting. Your blog name and the hosting are two very important aspects when it has to do with blogging in Canada.
Your blog name is also known as your domain name. For example, my domain’s name is oyinkuroatani.com and that’s the name of my blog.
Your domain name is also your brand so whatever you name your blog, when it becomes successful it would be known with the domain name. Just as we have Weraddicted.com, Forbes.com, and YouTube.com.
Before you choose a domain name here are a few things you want to consider.
- Go for a .com domain name over .org, .net and etc. For instance, Google.com – is easier to remember.
- Use keywords that define what your blog is about.
- If possible avoid using numbers and hyphens when choosing a domain name. They can be difficult at times to remember. for example; newsblog53.net. How did that sound? boring I guess.
Now let’s get to the second part, which is getting web hosting.
Getting a Web Hosting
A Web Hosting is a service that allows your blog to be accessed through the internet. This means that without web hosting, your blog can’t be seen online.
Also, your blog won’t have an address without a domain name – which means it can’t be accessed as well. So, the two work hand-in-hand, or should I say they complement each other.
There are many top web hosting companies from which to choose. Some of them cost between $3 and $500 each month. However, you don’t need an expensive web hosting package if you’re a beginning blogger.
If you are concerned about your site’s performance for SEO and your audience, the two most recommended and affordable web hosting providers are Hostinger and Fastcomet. I personally use Hostinger for my main site, so I strongly recommend this web hosting provider.
If you’re interested, here’s a detailed guide on how to host your website using Hostinger;
Starting a WordPress Blog with Hostinger in Canada
As stated earlier, Hostinger is one of the most reputable web hosting services you can use to start your blog as a beginner in Canada. This web hosting service has different mouth-watering features. For example;
- They’re unsurprisingly fast around the world.
- You get free Weekly Backups of your content.
- As a blogger, you get the benefit of using a simple and popular web hosting service.
- They also offer top-notch security features to gain customers’ and visitors’ trust.
- You can also make use of the intuitive Manager to manage your hosting account in case you want some setting tweaks.
- You can also find comfort in knowing that you’re using a high-Performing server to manage your blog
- You can also create other versions of your site in case you want to deploy them for future use.
Hostinger has several exciting features. I can make a whole review about the hosting service but that’s not the intent of this post. However, all I can say is if you are opportune, I’d advise you to host your website on this platform.
Now let’s see how to start your blog with Hostinger.
- Navigate the web page
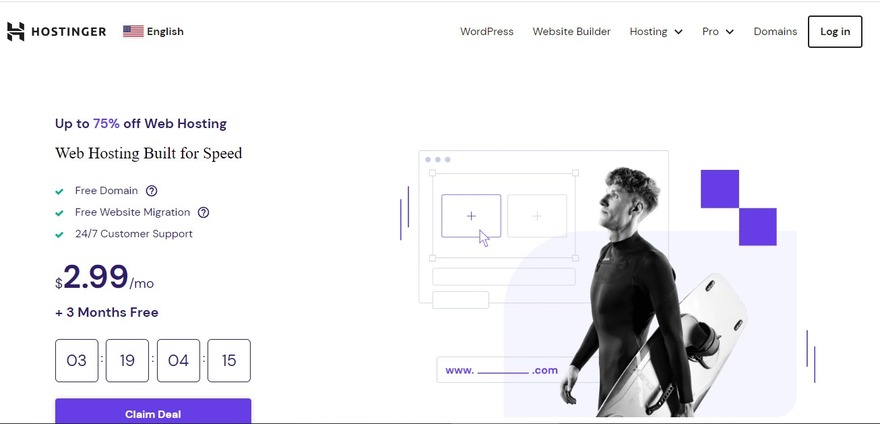
The first step is to navigate the Hostinger web page. To do this, head on to your browser and search for www.hostinger.com. Then you will arrive at the home page. Or you can just click this link; Hostinger Homepage
The homepage looks like this;
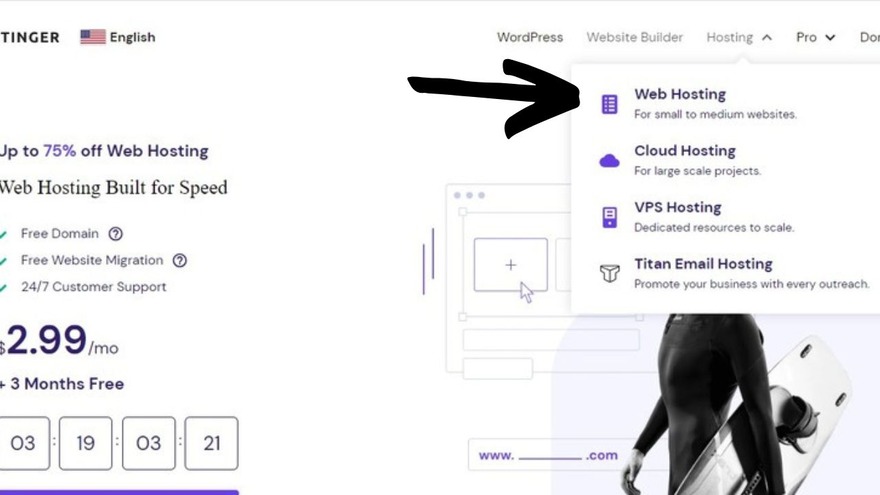
- Click on “Hosting”
After heading to the homepage, click on “Hosting”. After clicking on hosting, a list of hosting options will be displayed then select “Web Hosting” as seen in the image below;
- Select your Hosting Plan
After clicking on the web hosting, a list of web hosting plans will be displayed as seen below;
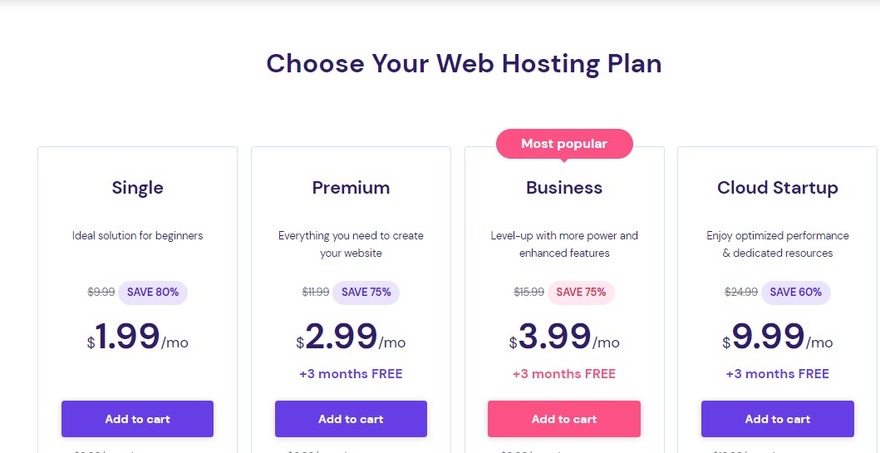
What you need to do is select your preferred hosting plan whether it is the Single plan, Premium plan, Business plan, or the Cloud Startup plan, click on your suited plan and proceed.
I’d advise that you look carefully at all the features attached to all the plans to help you choose wisely.
Another advantage of Hostinger is that the pricing for all the web hosting plans is very much affordable. With less than $10 a month, you can get hosting with a free domain name.
- Select Preferred Monthly Plan
With every web hosting plan, there are options for monthly subscriptions. You can decide to opt for the 1-month plan, the 12 months(1 year) plan, the 24 months(2 years) plan, or the 48 months (4 years) plan.
One other thing I noticed with the monthly plans is, the higher the month, the lesser the amount you have to pay. Let’s take the Premium plan for example.
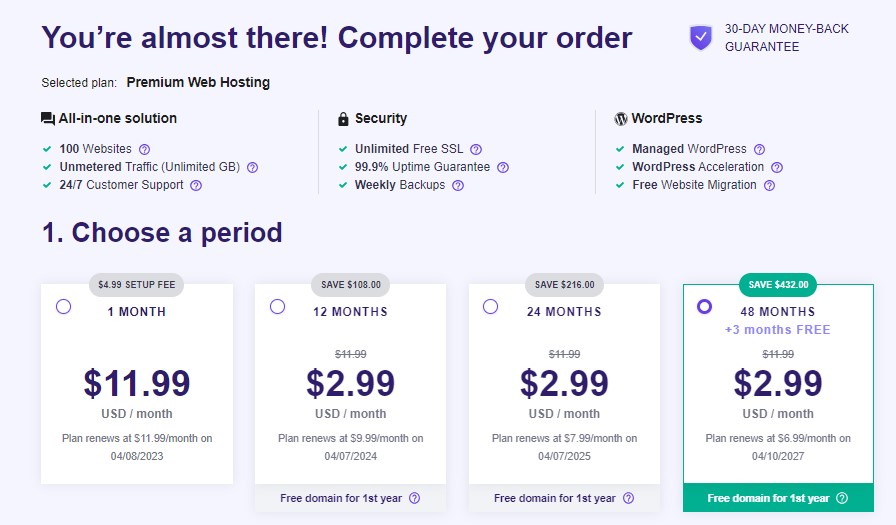
- The 1-year cost will be – $35.88 (SAVE $108.00)
- 2 years will be – $71.76 (SAVE $216.00)
- 4 years cost will be – $143.52 (SAVE $432.00)
Check the cost of the monthly plan and select the one that you will be able to afford and proceed to make payment.
- Create an account or Log in
If you paid detailed attention, you will notice I didn’t mention the need to sign up or log in to an account on Hostinger until now.
After selecting the plan you want to purchase, you will need to log in to your account or create an account if you do not have an account with Hostinger previously.
You can also link your Gmail or Facebook account to Hostinger and continue from there. This means you wouldn’t need to create an account anymore. All you need to do is fill in your Facebook login details(or Gmail) and click “Continue”
- Select your Payment Option
Now after signing up, you can proceed to make payment for your web hosting plan. Hostinger has different payment methods you can select from. You can find popular payment methods like Credit/Debit or ATM cards, Google Pay, Alipay Crypto – Coingate, and PayPal.
Just select your preferred payment method from the list and make your payment with ease.
- Get your confirmation and a welcome note from Hostigner
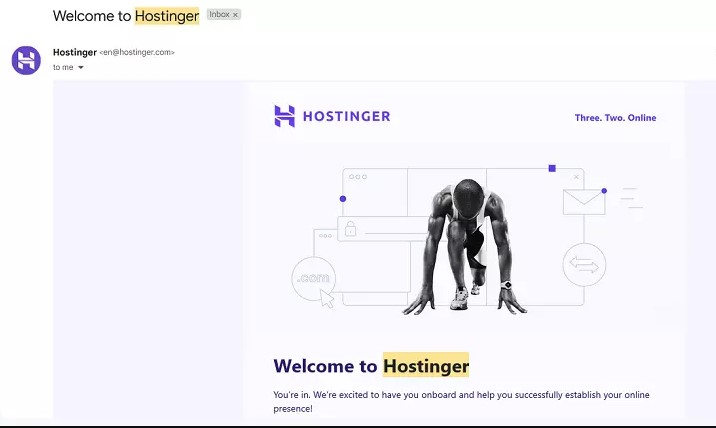
After making your payment, you will receive a welcome mail from Hostinger just like the one in the image above to confirm your purchase and from there, you can begin your journey.
Now that’s how you purchase web hosting from Hostinger but that’s not where it ends. Let’s continue…
Step 3. Install a Content Management System (CMS)
After getting your blog and hosting it, the next thing you want to do is install a content management system to help you manage and operate your blog with ease.
For a CMS, I strongly recommend WordPress. WordPress is easy to use and is the most widely used blogging software for most Bloggers today.
Also, you don’t need to pay a dime to use WordPress – it is completely free. If you make use of Hostinger, you will notice that the WordPress software has already been installed and all you need to do is get it ready for usage.
To do that, click on “Auto-installer” and install WordPress to start blogging. But let me show you a simpler and a few steps method using the Softaculous Apps Installer.
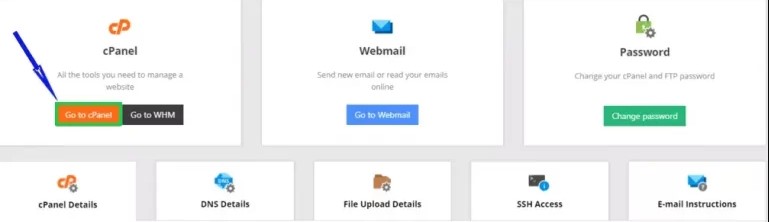
- Log in to your hosting account and head on to your cpanel account as seen in the image below;
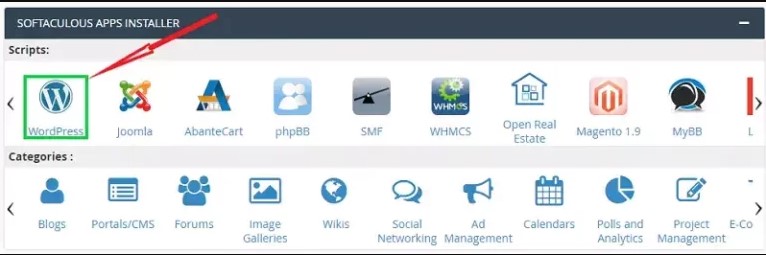
- Next, head on to the Softaculous app installer and click on WordPress as i did below;
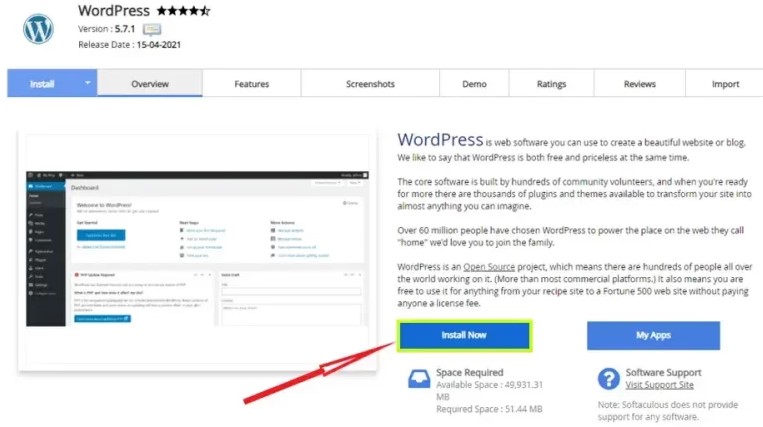
- Next, find and click on the “Install Now” icon. Use the image below as a guide so you don’t get lost;
- After clicking on the install icon, you will be given a form to fill out. Fill in your Site Name, Site Description, Admin Username, Password, and Email, then choose your preferred language.
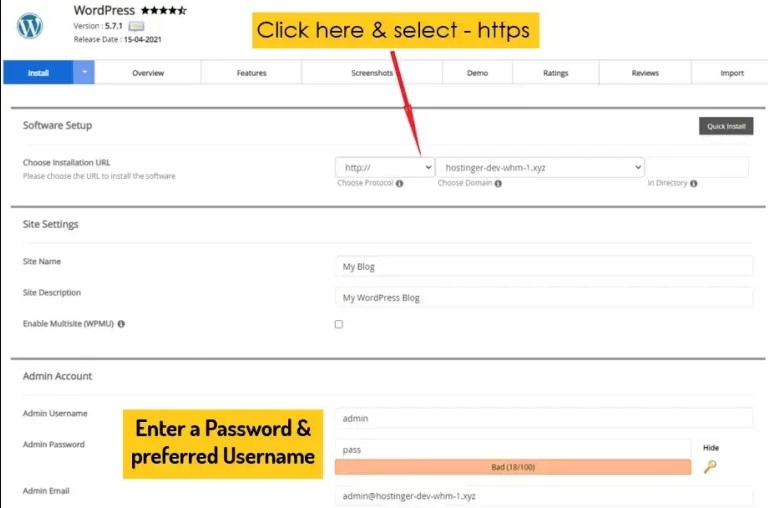
This form offers extra choices to assist in initiating your WordPress site:
- You can select specific plugins, such as Limit Login Attempts, Classic Editor, and Install LiteSpeed Cache.
- Additionally, you should choose a WordPress theme for your site by clicking on “Show All Themes” to search through the directory.
- Fill in the “Email installation details” field to receive all the necessary installation information.
- After completing the form, click on “Install” to proceed.
To access the installed WordPress Admin, simply click on the WP Admin icon located under the “Current Installations” section. You will be redirected to your Blog’s Dashboard.
- After that, you can now access your main blog by going to yourdomain.com/wp-admin.
For example, if the name of your blog is coldheart.com, you can access your blog by searching www.coldheart.com/wp-admin and you will be directed to a login page that looks like this;
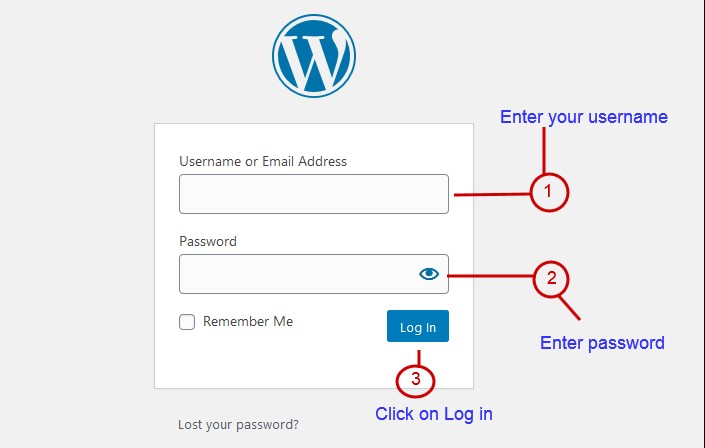
Now, all you need to do is enter your blog’s details. Your username, and password then login. You can also click on the “Remember Me” box so you don’t have to enter your login details again when next you want to log in.
When you log in, you will land on the dashboard page. It will look like this;
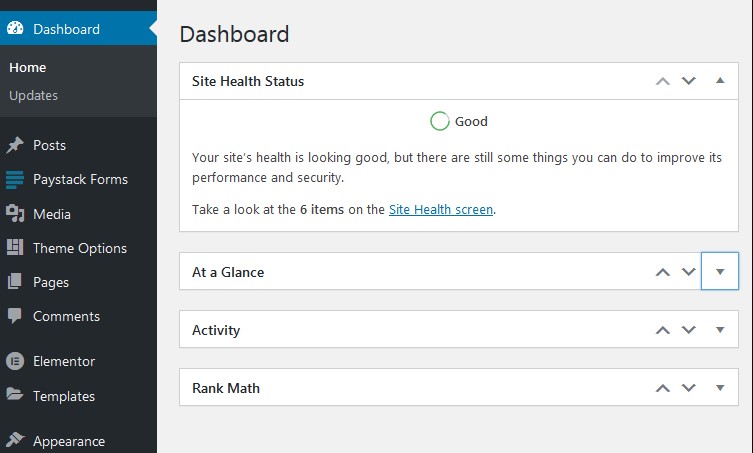
Wasn’t so hard was it?
Now that we’ve installed WordPress and we’ve logged in, let’s proceed to install plugins and themes.
Step 4. Install Themes and Plugins
Installing a theme on your WordPress account is just like changing a theme on your smartphone. It adds beauty to your site’s background.
To change a theme for your blog, click on the “Appearance” icon on the left side of your screen, then click on “Themes” as shown in the image below;
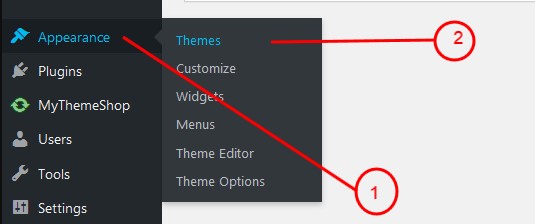
Mind you, WordPress always comes with the latest theme as the default theme. If you like the default theme, you can skip this section but if you don’t, click on “Add New Theme” and select another theme of your choice.
Note: The theme does not really count. It only changes the way your site looks so don’t get stuck changing themes. Just pick any and move on.
Installing WordPress Plugins
WordPress plugins can be compared to mobile phone applications as they enable you to accomplish tasks effortlessly, even without any coding expertise. Another reason why I recommend WordPress is because of the different Plugins it offers like;
- RankMath: Rank Math is an SEO product that combines the features of many SEO tools and gives you a guide on how to optimize your content and multiply your traffic.
- WordFence: Wordfence is a free enterprise-class WordPress security plugin that protects your website from attacks and malware.
- Akismet Anti-Spam: Akismet is quite possibly the best way to protect your blog from spam. It keeps your site protected 24/7.
- Two-Factor Authentication: Two-Factor Aunthenticationj protects your site with time-based one-time passwords, the Universal 2nd Factor (FIDO U2F), emails, and backup verification codes.
- Elementor: This is the most sophisticated drag-and-drop front-end page builder. You can swiftly create high-end, pixel-perfect websites with any theme, any page, and any layout
- WPS Hide Login: This plugin helps you to protect your website by changing the login URL and preventing access to the wp-login.php page and wp-admin directory while not logged-in
- LuckyWP Table of Contents: This plugin creates a table of contents for your posts/pages. It works automatically or manually (via shortcode, Gutenberg block, or widget)
And so on…
Installing RankMath Plugin for SEO
I will be installing RankMath plugin for SEO as an example. You can also use this method to install other plugins you want.
- Click on “Plugins” at the left corner of your screen
- Click “Add New”
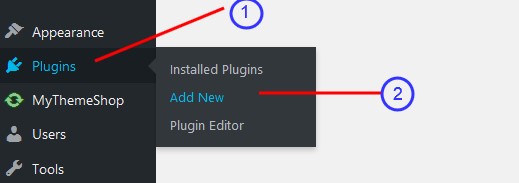
- Enter the name of the plugin. In this case, “RankMath”.
- Click on “Install” and then click on Activate to make it active.
And that’s how you install a Plugin on your WordPress blog. Now that we’ve known how to install themes and plugins, let’s set up the blog before we start publishing content.
Step 5. Set up your Blog for Launch
Setting up your blog means setting up the key functions to make it at its optimal point. So, what are those things you need to set up?
- Set up Permalinks
Permalinks play a crucial role in optimizing your blog for search engines (SEO) by defining the URL or link structure of your blog.
For example, check out this link – www.oyinkuroatani.com/make-money-with-cryptocurrency/
You can easily understand what the content is about, compared to this link; www.oyinkuroatani.com/5390.
By default, your permalink would be disorganized. To set it up for better understanding, simply click settings by the left corner of your screen and click on “Permalinks” as shown in the image below;
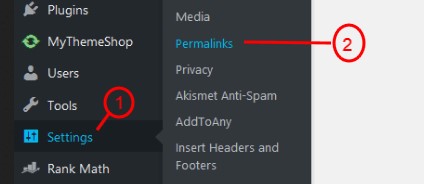
Select the permalink that says “Post Name” and click “Save Changes” at the bottom of the page.
- Set up your Blog for SEO
Optimizing or configuring your blog to attract search engine traffic involves making it discoverable on search engines for specific keywords and phrases.
While Search Engine Optimization (SEO) is a broad topic on its own, for immediate results, you can utilize a free WordPress plugin called RankMath, which we installed earlier.
RankMath simplifies the process of optimizing the technical aspects of your blog to enhance its visibility on Google and other search engines.
- Create Categories
Categories play a vital role in segmenting and organizing your posts in a meaningful manner. This not only improves the overall structure and navigation of your blog but also contributes to SEO.
By assigning relevant categories to your posts, you create a logical hierarchy and make it easier for both readers and search engines to understand the content and context of your blog.
For example, if you run a football blog, your categories can be like this;
- Manchester United FC
- Chelsea FC
- Real Madrid FC
- Barcelona FC
- Newcastle United FC, and so on…
This way, the search engines know how to rank your football blog posts for the search terms of random readers. To create categories, follow these steps;
- Click on “Posts” at the top right corner of your screen
- Click on “Category” under the post
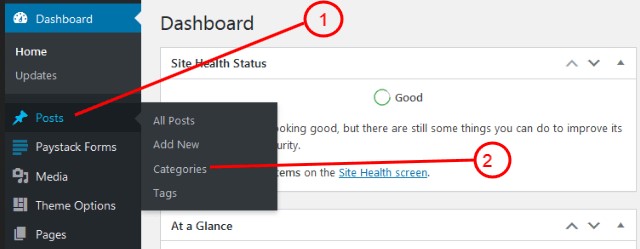
- Name your category
- Select the parent folder – use none. (None means it will be a standalone category)
- Lastly, give it a description, and click “Add Category”
Now that we have created the category, you can now move on to the next part, which is one of the most important parts of blogging in Canada.
Step 6. Structure and Publish your first Blog Post
I think before asking how to create a blog in Canada, the first step is to have quality content writers, or perhaps have a content calendar. If you’ve made it to this point, I’m proud of you.
In a few seconds, I will be showing you how to write content that will rank on search engines (Google and Bing).
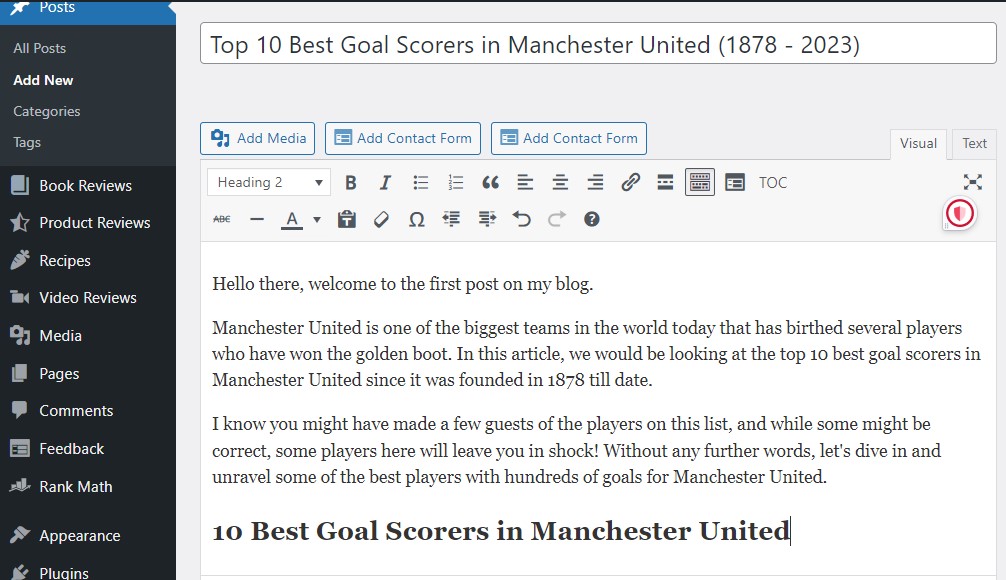
For example, you want to write an article with the title – “Top 20 Best Goal Scorers in Manchester United”.
The focus keyword here will be “Best Goal Scorers in Manchester United”
Since “Best Goal Scorers for Manchester United” is the keyword or phrase you want to rank for, it is important to include the Keyword at least 5 times – One in the introduction, Three in the body of the content, and One in the conclusion.
With this strategy, the search engine will know what your content/article is about, and thereby help you rank for that keyword. Here’s a content structure that can help you win the competition;
- Blog Post Title: Top 20 Best Goal Scorers for Manchester United (1878 – 2023)
- Introduction (Briefly say what the content is all about, and what you want to achieve with the content. Add the focus keyword at least once here).
- Body – H2: Best Goal Scorers in Manchester United (under this heading, you can now list the top 20 players using H3, then give a little overview about the player. For example;
– Wayne Rooney – 253 Goals (with H3)
– Bobby Charlton – 249 Goals (with H3) - FAQs – H3: Here you can add some frequently asked questions about Manchester United’s players and every other related question using H3.
- Conclusion – H2: Here, all you need to do is give a little summary about the team, and every other points you talked about. Remember to add your focus keyword here also.
Now that you’ve known how to write an article, let’s do some practicals in the WordPress editor.
How To Optimize and Publish Your First Blog Post
To create a post on your blog, click the “Posts” icon at the left corner of your screen, and select “Add New” as shown in the image below;
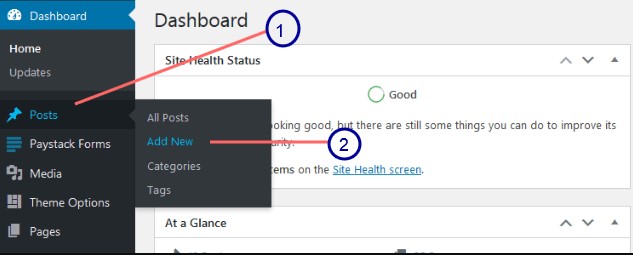
When you click on “Add New” you will be given a blank page to express yourself.
Now you can start by writing your topic, then come down to the introduction just as I did below;
On the right-hand side of your screen, you will find the categories you created. Select the category you want the post to be in, and continue.
At the bottom of the right corner of your screen, you will find a space to insert your featured image – This is the image banner that your content will carry.
Also, at the bottom of the page, you will find the Rank Math section. You can use that section as a guide to writing your content. Aim for a higher score – A higher score means higher chances of ranking for that keyword.
How to optimize your Blog Post for SEO using RankMath Plugin
To better explain the last section, I had to create this section. To optimize your content better for search engines, enter your main keyword into the RankMath SEO plugin.
Our keyword from the above article is “Best goal scorers in Manchester United”. You can enter the same and click on “Edit Snippet” for advanced optimization.
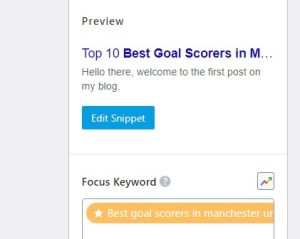
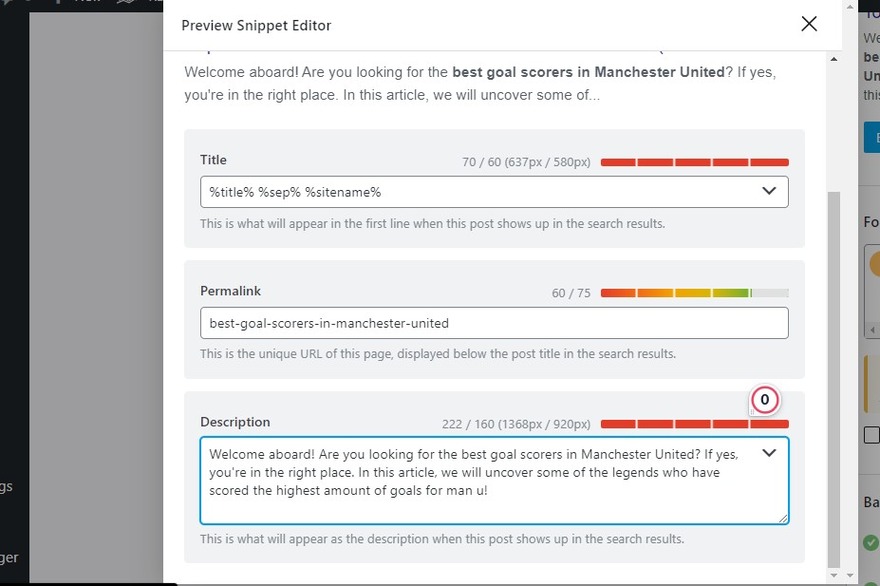
When you click on Edit Snippet, you will find three columns there – Title, Permalink, and Meta Description. Now why do they even matter?
Title: The title of the content matters a lot cause that’s what the content is all about. However, you don’t need to edit the title because WordPress will auto fill it for you – it was built like that.
Permalink: The permalink defines your blog post URL. For example, oyinkuroatani.com/make-money-with-cryptocurrency. make-money-with-cryptocurrency would be the permalink. It is always helpful when you include your focus keyword, or related keywords in the permalink.
Meta Description: Your meta description helps Search Engines understand your content better. Also, when your post ranks for a particular keyword, your meta description will serve as a hook to entice people and make them click through.
It is also very important to include your focus keyword in the meta description so Search Engines know what your article is all about.
So when you click on Edit Snippet, fill in all the necessary details as I did with the sample article below;
When you are done editing the permalink and the meta description, exit the page by clicking on the X at the top of the page. Now you can finish up your article and hit the publish bottom. I can vividly recall how exciting it was when i published my first content.
Now that you know how to write content and optimize it for search engines, let’s now go on to the next step which involves driving traffic and promoting your blog!
Step 7. Drive Traffic & Promote your Blog
Firstly, what does traffic mean in blogging terms, and why is it important?
In simple terms, traffic refers to the number of visitors or users who access and engage with your blog or website. Traffic has a lot of importance… For example;
- Without traffic, you can not apply for ads, which is one of the ways to monetize your site.
- Also, if you offer services through your blog, it is the visitors(traffic) that would request your services.
- Even if you sell products through your blog you will only make sales when there is traffic I.e when you have visitors.
So how do you drive traffic to your blog?
You have to announce your visibility to the public. There are a few things that you can do to increase your visibility such as;
-
Posting in Forums
The first option is posting in forums. There are several forums in Canada that you can engage in and let people know about your blog and the type of content that you put out. Some popular forums in Canada include;
If you know others you can create an account with the name of your blog and start interacting with other folks.
-
Use Facebook Groups
Another place to increase your blog’s visibility is via Facebook groups. And how do you utilize Facebook groups? Do these;
- Enter Facebook and navigate the search bar.
- Search for keywords relating to your niche. For example, you run a football niche, you can search for “Football” or “Football Updates”.
- WHen the available groups pop up, join as many as poossible
- Interact in the groups and always drop your links if you have content that solves any problems.
-
Try Guest Posting
Guest posting refers to the practice of writing and publishing content on someone else’s blog or website as a guest author. Here’s a glimpse of how it works;
Since your blog is newly established, you lack recognition among the audience. Considering this, one effective approach to gain visibility is to leverage the existing audiences of similar blog sites.
Here is what to do.
- Explore blogs similar to yours using Google search.
- Look for guest posting opportunities on those blogs and reach out to them.
- Prepare a draft of your guest post and submit it for review.
- Once approved, have your guest post published.
- Benefit from increased visits to your blog and receive a free backlink, which aids in improving your search engine rankings. Backlinks are links that direct back to your blog and contribute to SEO.
-
Drive Traffic via Pinterest
Pinterest is another great platform that you can leverage to drive traffic to your blog. How to do that? very simple. All you need to do is;
- Create a Pinterest account
- Join relevant Pinterest groups related to your niche
- Post and pin your articles there and Pinterest users will definitely click on the links.
Pinning your post in group boards offers the advantage of exposing it to a large audience of Pinterest readers. As these boards are viewed by thousands of users, some of them may click on your Pin and visit your website.
-
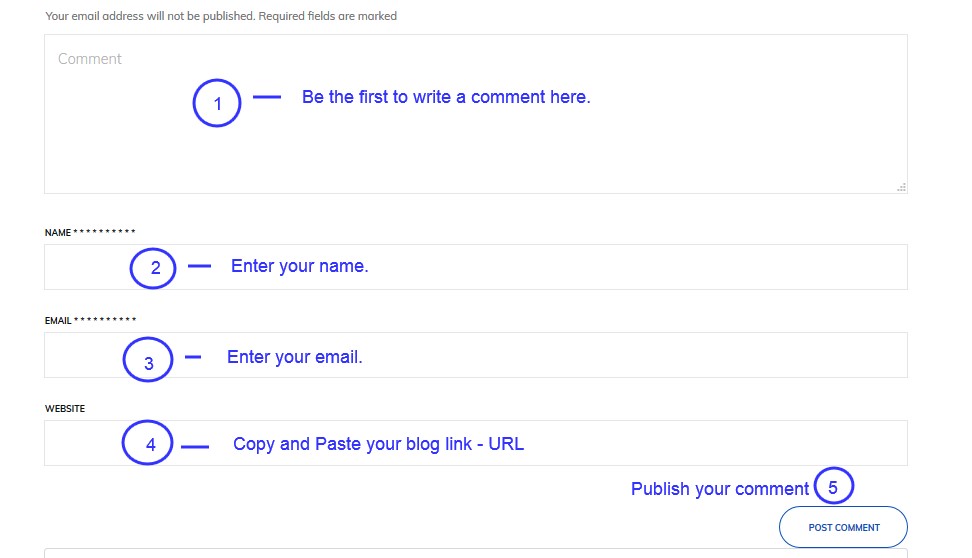
Drive Traffic via Blog Commenting
Blog Commenting involves commenting on other people’s blog in your niche, and this is also a strategy you can use to drive traffic to your blog. How does this work?
Let’s say you run a football niche. This is what you need to do;
- Search a keyword in your niche, for example – Best midfielders in Manchester United.
- Click on the first or second content ranking for that keyword on Google.
- Read through the article and scroll down to the comments section
- Leave valuable comments, and add a link to your blog.
Do this in many other blogs to build your backlinks which is also helpful for SEO. See a sample of the comment section below;
-
Drive Traffic by Boosting posts on your Facebook Page
If you are determined to making money through blogging in Canada, then you definitely need to put this method into consideration as it is one of the fastest way to drive traffic to your blog.
Boosting posts on your Facebook page involves spending money to push your post to a larger audience. With as little as $5, you can boost your article’s outreach on facebook and as time goes on, you can decide to increase the price to reach a larger audience. Here’s how to go about it;
- Create a Facebook Page
- Post some content from your blog and include the link
- Get a few likes on the page and invite friends to like the page
- Boost your page and watch your traffic grow
Now that’s how to drive traffic to your blog. You can try several of these methods however, i will advise you start from commenting, and guest posting.
Now that we’ve set up the blog, posted some contents and driven traffic to the blog, how do we start earning money from blogging in Canada? Read on to find out the next step.
Step 8. Monetize your Blog
Now this is where you begin to reap the fruits of your labour. So how do you monetize your blog or should i say how do you get your blog to start paying you?
There are several means of monetization and i will be sharing as many as possible here but for starters, let’s look at the top three ways to monetize your blog which are;
- Displaying of Advertisements Networks
- Through Affiliate Marketing
- Through Offering of Services
How to Monetize your blog with Display Advertisements Networks in Canada
The first method of monetization we would be looking at is through displaying of ads on your blog. These are the ads that you see on many blogs on the internet. These ads look like this;
There are different advertisement networks that you can apply for that will pay you for every click on the ads. They include Google AdSense, Ezoic, Mediavine, Medianet, and many others.
Displaying of advertisement is one of the major ways to earn money through blogging in Canada but how do you make money through displaying of advertisements? Here’s how it works;
- Firstly, you need to have up to 5k traffic(visitors) monthly on your blog
- When you have a reasonable amount of traffic, you then apply for Google ads
- Wait for a week or two weeks at most to get a confirmation mail
- set up the ads and start earning even in your sleep.
I prefer Google AdSense network because it does not have an exact traffic requirements before it accepts your site.
For comparison, you need at least 10,000 visitors on your site monthly before you can monetize your site with Ezoic ad network.
With the Mediavine Ad Company, you need at least 25,000 traffic per month and that is how it is with many other Ad Networks.
So that’s how you monetize your blog with Google AdSense – get traffic, apply for ads, get approved and start earning. Now lrt’s see other means of monetization.
How to Monetize your blog with Affiliate Marketing in Canada
Before we discuss how to make money with affiliate marketing, what is affiliate marketing?
Affiliate marketing involves earning commission for recommending products to your audience.
For example, let’s say I write an article on the best shoes for footballers. After reviewing the shoes, i put a link to where you can purchase the shoes. If anyone clicks the link and buys the shoe from that link, i will get a commission for that purchase.
So basically, that is how affiliate marketing works. So you can partner with other online stores and promote their products and get a commission for every purchase. Incase you’re still lost, here’s a detailed guide to Affiliate Marketing.
Monetize your blog with Service offers in Canada
Another fast way to make money through blogging in Canada is by offering services. There are several services you can offer in the online space. Let’s use freelance writing for example.
Let’s assume you are a content writer on Fiverr. You can create a page on your blog and title it “Hire Me” then fill in your contact details or Email address where clients can locate you.
This way, when visitors come to your site and are pleased with the way you write, they can easily contact you with gigs. And the same process applies to other services.
Offering services is the only method that does not require thousands of visitors per day to make money. Once you get potential clients, you can work for them and make your money.
Other Ways to make Money through Blogging in Canada
While the three methods listed above are very popular, there are other advanced methods in which people can make money through blogging in Canada.
For instance, if you run an fitness blog, you can create a course on how to get 6 packs in 30 days and sell the course on your blog.
When people are convinced with the kind of content that you upload and they see your results, they will most likely sign up for the course and thereby multiplying your streams of income.
Another way to make money from blogging in Canada is through sponsored post. This is when companies or other bloggers contact you to post their content on your blog then you will charge them for that.
This is one of the easiest ways to make money through your blog. However, you won’t get such offers till your blog is well established and you’re getting a reasonable number of views.
So, the goal should be to first put out enough content on the blog and grow your traffic before you can start earning from it. Now that we know how to monetize the blog, let’s talk about scaling up your blog for success.
Scaling your blog for success in Canada
Like i said in the beginning of this post, i failed not once when i started blogging because of lack of information and that’s why I’m sharing these tips you can use to scale up your blog for success.
There are two ways you can scale up your blog for success. These include;
Using Google Alerts.
You can scale up your blog using Google Alerts. Here’s how it works;
Google Alert is a Google tool that sends notifications about your specified topic of interest.
For example, if your blog is about Football, all you need to do is create a Google Alerts account, enter a list of football clubs you want Google to send you alerts when they upload new contents.
After then, Google will send you alerts when any of the football clubs are mentioned online. That way, when a big club publishes a content, you will be notified and you can go and make a comment on the blog (your goal should be to make the first comment).
Over time, when others view your comments as the first commenter, they may click on your website link in the comment box, leading them to your blog. This results in additional traffic, serving as a bonus for you.
Using Email Marketing
From the very beginning, it is important to gather the email addresses of your readers. Why is this important? It is because the real value lies within the email list you build today.
Aside from sending them emails to read your blog articles, building relationships through email enables you to generate income even before launching your services or an online course.
To begin, it is recommended to utilize a reputable email service provider such as Email Octopus, which offers a free option.
EmailOctopus allows you to manage up to 4,000 emails without requiring an upgrade to a paid subscription.
How To Add Your Website To Google Search Engine
Now the work doesn’t stop when you buy your hosting or when you install a plugin. As far as Search Engine is concerned, your site doesn’t exist. So how do you add your website to Google search engine? Follow these steps;
- Start by launching your blog or website.
- Access your dashboard and log in.
- Navigate to the plugins section and install the “Headers and Footers” plugin from the plugins directory.
- Head on to Google Search Console and create an account
- Go to Add site and paste the URL of your website/blog in Google Search Console, then copy the Meta code provided.
- Open your website and paste the meta code into the header section of the Headers and Footers plugin.
- Save the changes by clicking on the “Save” button.
- Return to Google Search Console and click on “Verify” to confirm the connection between your website and Google Search Console.
And that’s how you introduce your site to Google.
Frequently Asked Questions About How to Start a Blog in Canada
What is the cost of starting a blog in Canada?
The cost of starting a blog varies, depending on the kind of blog that you wan to launch. However, the estimated amount for starting a blog in Canada is from $100 – $150 (With Hostinger that gives free domain).
How Much Do Bloggers Make in Canada?
Honestly, bloggers make a whole lot of money in Canada. As a matter of fact, there are many individuals who have made over $50k in one month from blogging in Canada.
Personally, I have made reasonable amounts of money from blogging. Not to brag, but in the last five months, I’ve made over $120k, averaging $30k per month but it wasn’t always like this.
It is good to note that the income of bloggers in Canada can vary significantly depending on various factors such as niche, audience size, monetization strategies, and the blogger’s level of dedication and consistency.
How Can I Make Money Fast from Blogging in Canada?
There are several ways to make fast money through blogging in Canada including:
- Advertising: Bloggers can make money by displaying ads on their blogs through networks like Google AdSense or direct advertising partnerships.
- Affiliate Marketing: You can also earn commissions as a blogger by promoting and recommending products or services through affiliate links on your blog.
- Sponsored Content: Bloggers also earn money by collaborating with brands to create sponsored blog posts, reviews, or social media campaigns.
- Digital Products: As a blogger, you can also earn money by selling e-books, online courses, or other digital products relevant to your niche.
- Services: Also, offering services such as consulting, coaching, or freelance writing can help you generate other funds as a blogger.
While these methods are very vital for generating income through blogging, it can never be overemphasized that blogging requires significant time and effort before seeing substantial returns.
Before I give you the steps to creating your blog, let me answer a few questions I always get.
How do bloggers earn money with ads in Canada?
In Canada, bloggers often monetize their websites through two common methods: placing ads and engaging in affiliate marketing.
For Ad Placements, there are two types of ads:
CPC/PPC Ads: These are Cost per Click ads, where ad banners are placed within the content or sidebar. Bloggers earn money for each click generated by readers on the ads.
CPM Ads: Known as “cost per 1,000 impressions,” these ads pay bloggers a fixed amount based on the number of people who view the ads on their blog.
Affiliate Marketing:
Bloggers promote products and services through affiliate marketing, earning commissions for each sale or action generated through their referral links.
These methods serve as popular revenue streams for Canadian bloggers to monetize their websites effectively.
How Can I Make Money Fast as a Beginner Blogger?
Affiliate marketing is considered one of the most effective ways for new bloggers to quickly monetize their websites.
With a moderate traffic range of 200 – 500 readers who engage with your product reviews, price comparisons, or related content, there is potential for them to click on your affiliate links and make purchases based on your recommendations.
This allows you to earn commissions from those purchases, enabling you to generate income swiftly through affiliate marketing.
How to Start a Blog in Canada for Free and Make Money
There are many platforms you can use to start a blog in Canada for free. Some of them include Medium, WordPress.com, Blogger, Wix, Strikingly, etc.
Is it possible to change a domain name?
Yes, it is possible to change your domain name. All you need to do is contact your hosting company and tell them to send the traffic of the former domain name to the new one.
Which is better to start a blog, WordPress or Blogger?
While both of them are good and can help you make money, the best remains WordPress.
How can I add 2FA Security to my Blog?
You can make use of a Google Authenticator – WordPress Two Factor Authentication (2FA, MFA) by miniOrange.
Conclusion on How to Start a Blog in Canada
And that brings us to the conclusion on how to start a blog in Canada. If you’ve followed me from the beginning of this post till now, I’m sure you’d have been equipped with all the information you need to kick start your blogging journey.
While blogging can be rewarding, it is important to note that your success depends on your commitment and the effort that you put in.
By following the step-by-step guide outlined in this article, you can embark on your blogging journey with confidence. From choosing a niche, selecting a platform, to creating compelling content and engaging with your audience, every step plays a vital role in building a successful blog.
Additionally, don’t forget to leverage various monetization strategies such as ads, affiliate marketing, and sponsored content to maximize your earning potential. Goodluck!